 Save
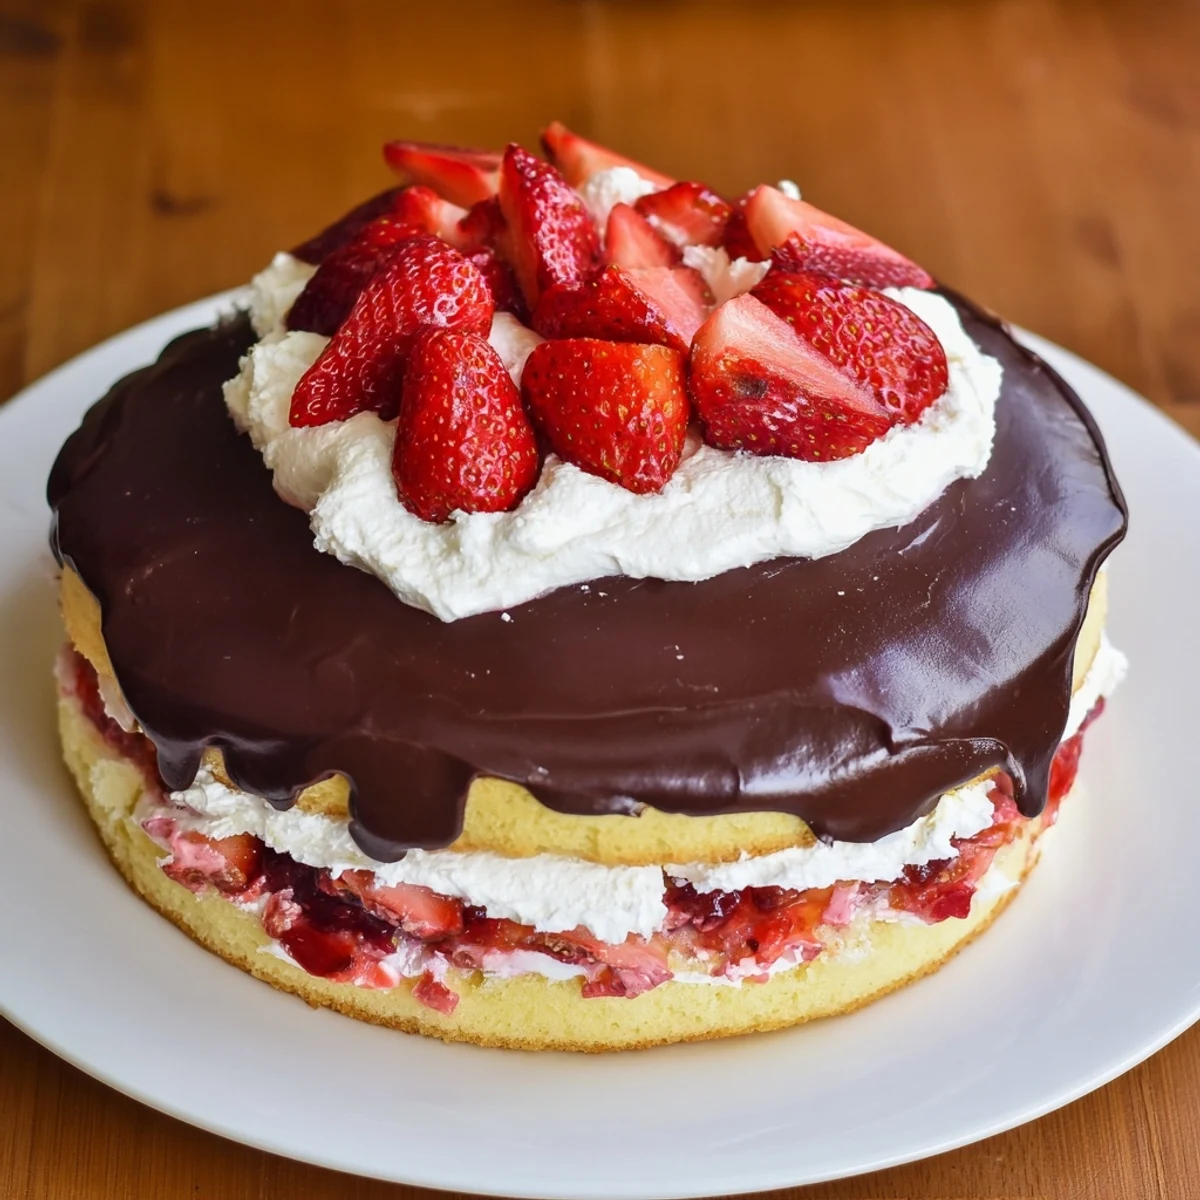
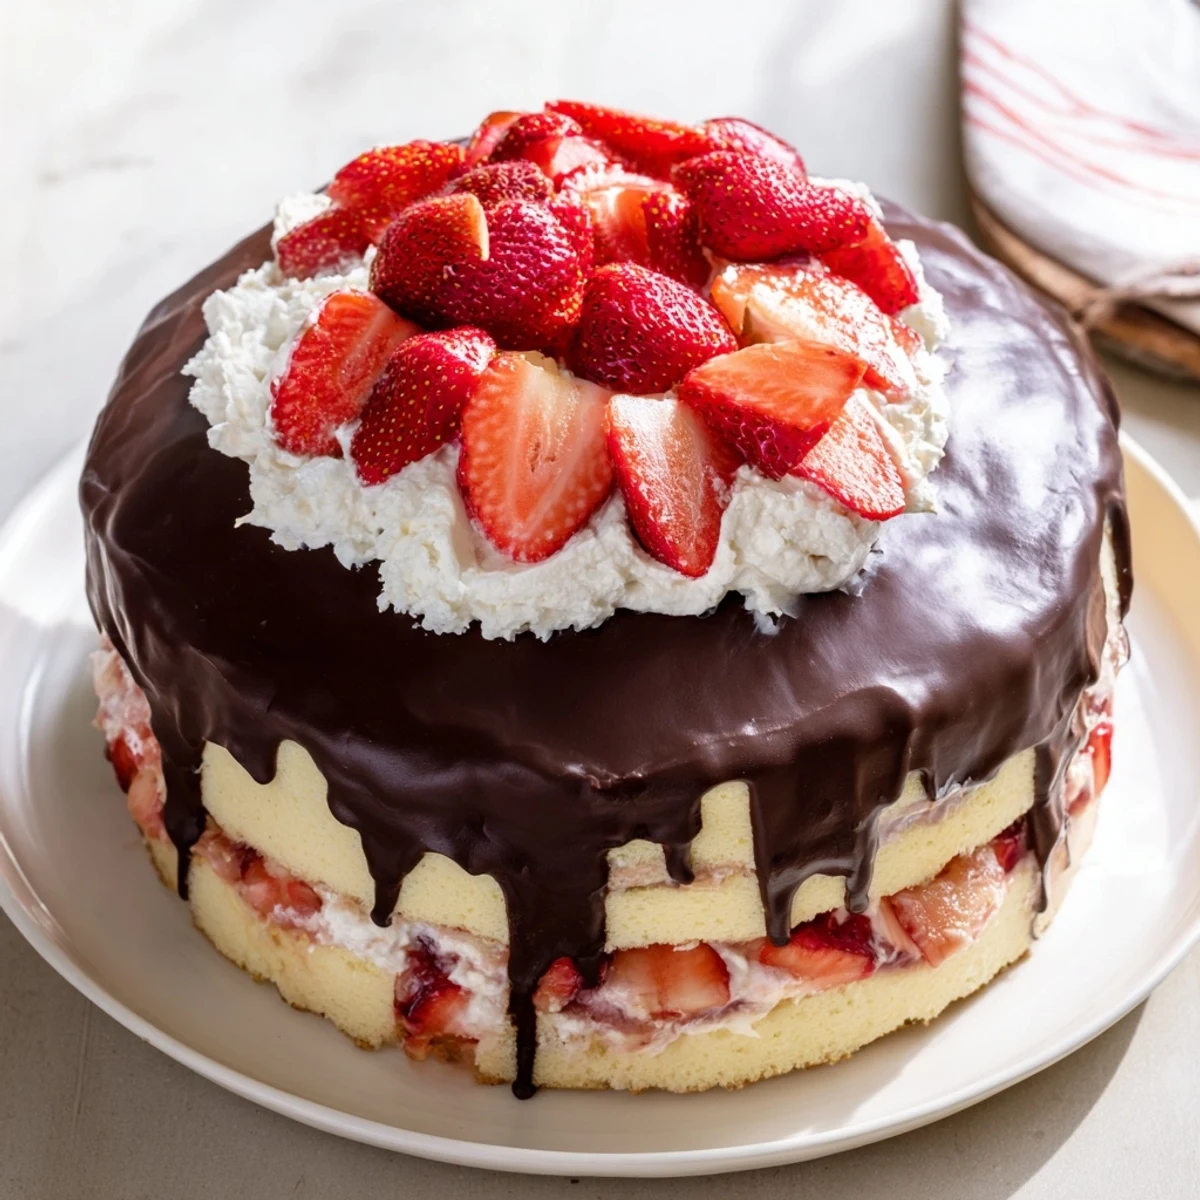
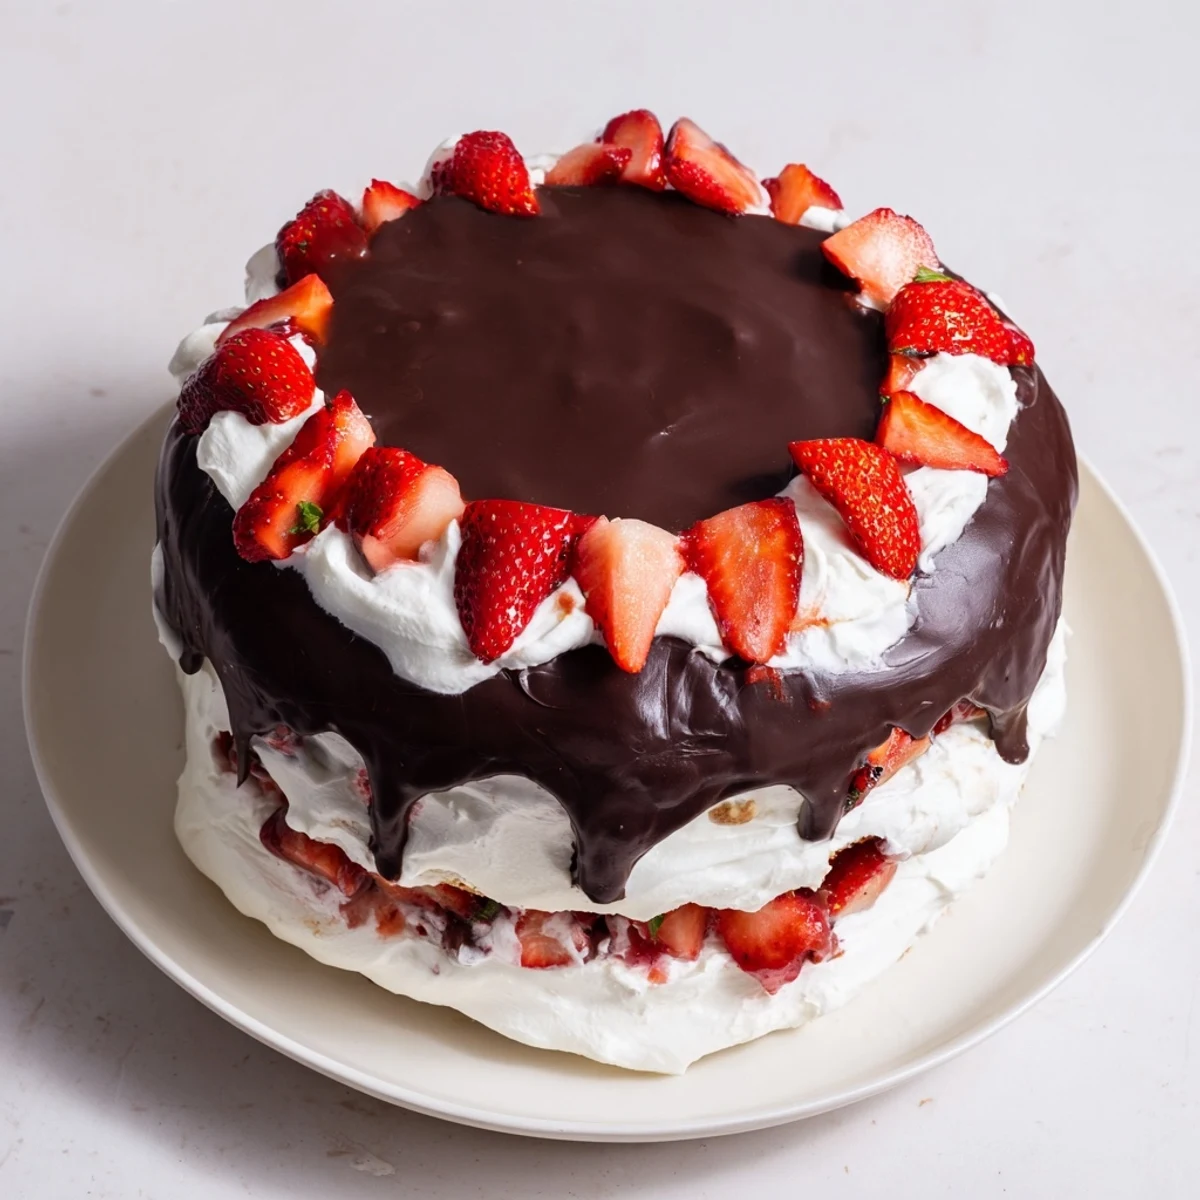
Save This impressive creation combines classic vanilla sponge layers with a vibrant strawberry compote and billowy whipped cream. The magic happens when chilled layers receive a cascading pour of melted dark chocolate mixed with coconut oil, creating that signature crackling shell that breaks beautifully with each fork. Perfect for special occasions, the contrast between the airy sponge, tangy-sweet berries, creamy filling, and crisp chocolate exterior creates an unforgettable tasting experience.
The first time I attempted a chocolate shell cake, I stood in my kitchen at midnight watching the glossy dark chocolate cascade down the sides and wondered if I had completely lost my mind. That satisfying crackle when you cut into it? It makes everyone at the table go quiet before they even take a bite. My sister still talks about the birthday cake I made three years ago, describing how the chocolate shell shattered like thin glass.
Last summer I made this for a dinner party when it was sweltering outside, and something about that cold, snap-crackle chocolate shell felt like a revelation. I watched my friend Sarah take her first slice, her eyes widening as the chocolate made that distinctive cracking sound. She grabbed her phone immediately to capture the moment, which is basically the highest compliment a dessert can receive in the social media age.
Ingredients
- All-purpose flour: The protein structure here matters for lifting all those heavy toppings later
- Baking powder: Do not skip or substitute—this sponge needs real height
- Salt: Just a pinch makes all the difference balancing the sweetness
- Eggs: Room temperature eggs whip up dramatically fluffier than cold ones
- Granulated sugar: This works with the eggs to create that tender, airy crumb
- Whole milk: Full fat keeps the sponge moist without making it heavy
- Unsalted butter: Melt it first and let it cool slightly so it does not scramble your eggs
- Vanilla extract: Pure extract makes a noticeable difference in the final flavor
- Fresh strawberries: Choose berries that smell fragrant, as that is where all the flavor lives
- Lemon juice: Brightens the strawberry filling and helps the cornstarch activate
- Cornstarch: This transforms the strawberries into a spreadable jam-like layer
- Heavy cream: Cold cream is non-negotiable for achieving stiff peaks
- Powdered sugar: Sweetens and stabilizes the whipped cream simultaneously
- Dark chocolate: Go for at least 60% cocoa—the shell needs structure from that cocoa butter
- Coconut oil: This keeps the chocolate flexible enough to crack rather than shatter
Instructions
- Bake the foundation:
- Preheat your oven to 350°F and grease two 8-inch round pans. Whisk the flour, baking powder, and salt in one bowl while beating eggs and sugar in another until they are pale and fluffy, about five full minutes.
- Bring it together:
- Gently fold the flour mixture into those puffed eggs, then stream in the milk, melted butter, and vanilla. Stop mixing as soon as everything disappears—overworking will make your sponge tough instead of tender.
- Let them cool completely:
- Divide batter between the pans and bake for 25 to 30 minutes until a toothpick comes out clean. Give them ten minutes in the pans, then turn onto wire racks and walk away until they are entirely room temperature.
- Make the strawberry magic:
- Toss diced strawberries with sugar, lemon juice, and cornstarch in a saucepan. Cook over medium heat, stirring constantly until the mixture transforms into something glossy and jam-like, about seven minutes.
- Whip the cream:
- Pour cold heavy cream into a chilled bowl with powdered sugar and vanilla. Beat until you can lift the beaters and the cream stands up in proud, stiff peaks.
- Build and freeze:
- Place one cake layer on your serving plate and spread with cooled strawberry filling. Top with whipped cream, add the second cake layer, and cover the entire cake with remaining cream. Pop it in the freezer for exactly one hour—the chocolate shell needs a firm, cold surface.
- Prepare the waterfall:
- Melt dark chocolate with coconut oil over a double boiler or in short microwave bursts. Let it cool to room temperature while still pourable—hot chocolate will melt your cream layer.
- Create the shell:
- Take that frozen cake out and pour the chocolate directly over the center. Watch it cascade down the sides and cover everything, then let it set for about thirty minutes before you even think about slicing it.
 Save
Save There is something deeply satisfying about serving a dessert that literally cracks when you cut into it. My niece asked if I had used edible glass the first time she experienced it, and honestly, that comparison stuck with me.
Getting That Perfect Crack
The chocolate shell needs the cake to be extremely cold, which is why the freezer step cannot be skipped. I once tried rushing this step and ended up with chocolate streaks running down the sides instead of a smooth coating. The temperature difference between the warm chocolate and frozen cake is what creates that dramatic snap.
The Strawberry Situation
Fresh strawberries vary wildly in sweetness depending on the season. Taste your filling after it cooks down—if it seems too tart, add another spoonful of sugar. I have learned that slightly under-sweetened berries balance beautifully with the rich chocolate shell.
Making It Ahead
This cake actually improves after sitting overnight in the refrigerator. The flavors meld together and the texture becomes more cohesive. Just know the chocolate shell will lose some of its crackle, so if you are going for maximum drama, pour the shell the day you plan to serve.
- The assembled cake can be frozen for up to a week before adding the chocolate shell
- If you are transporting this cake, keep it flat and level to prevent the chocolate from cracking prematurely
- Serve this cake cold for the most dramatic shell effect
 Save
Save Every time I make this cake, I am reminded that the most impressive desserts often come down to one spectacular finishing touch. That chocolate shell is worth every extra minute.
Recipe FAQs
- → Why must the cake be frozen before applying the chocolate shell?
-
Freezing firms up the whipped cream and filling, ensuring the chocolate mixture sets quickly and forms that signature crackling shell rather than pooling or melting into the creamy layers.
- → Can I make the components ahead of time?
-
Yes, bake sponge layers up to 2 days ahead and wrap tightly. Prepare strawberry filling 2-3 days in advance. Whipped cream is best whipped fresh, but can be prepared hours before serving.
- → What chocolate percentage works best for the shell?
-
Dark chocolate between 60-70% cocoa provides ideal richness and structure. Higher percentages may be too bitter, while lower percentages create a softer shell that lacks satisfying snap.
- → How do I achieve the perfect drip effect?
-
Pour the cooled chocolate mixture slowly over the center of the chilled cake, allowing it to cascade naturally. Work quickly as the shell begins setting immediately upon contact with the cold surface.
- → Can I substitute other fruits for the strawberry filling?
-
Raspberries, blackberries, or mixed berries work beautifully following the same cooking method. Adjust sugar slightly based on fruit sweetness and ensure proper thickening.
- → How long does this dessert need to chill before serving?
-
After applying the chocolate shell, chill 30 minutes minimum for optimal slicing. The completed creation stays fresh refrigerated for 2-3 days, though the shell may soften slightly over time.